yarn wrap falls
Posted: Tue Nov 17, 2009 11:08 am
I'm really not sure what to call this, but I found pics on my comp of a tutorial I made ages ago with a shoddy camera phone (The picture quality shows).
I hope no one minds me posting this.
Also I know a fair while back I had this was posted on VF's DTBD cult (My username was CitronicKitten), my account since has been deleted due to inactivity - So I'm not sure if this is still up there, of if it's fine to repost. If not, it can be taken down.
So the main idea behind these was I just wanted to get rid of some masses of el cheapo acrylic blended yarn you normally use for knitting that I had lying around. And yarn wraps I think are generally wrapped around your own hair, and I just used these to make falls instead as a more temporary option but didn't want them to look too obviously 'yarn-y" haha.
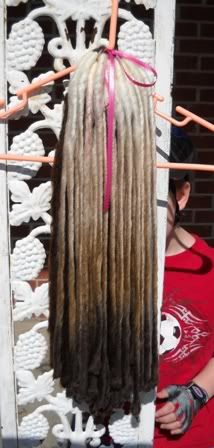
Pics of the end result:

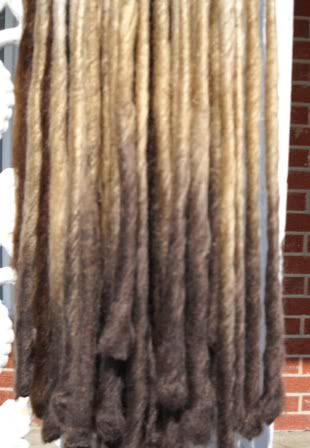
Closeup:

Again I apologise for the pic quality, I don't mind redoing this at a later date with clearer pics.
What you'll need:
Some cheap yarn
Lace, or something to attach them to.
Scissors
A stiff-bristled scrub brush
Straightener.
1. Cut your lengths of yarn, generally longer than the length you want the end result to be.
(I used two different colours to show what was going on inside and outside)

2. Loop several strands of yarn over the lace and start braiding tightly until you get to the end.
Use more yarn to if you want a thicker end result.

3. Once you get to the end, use one of the loose end bits to make a tight knot at the end of your braid.

4. Using about 6-8 strands of yarn you've already precut, place them in a straight line without overlapping behind your braided strand. With about 2 inches overhanging on the left.

5. Fold the 2 inches on the left in a diagonal towards the right, holding it down tight.

6. Cross the remaining length you had overhanging on the right back over the diagonal bit you've just done, and wrap tightly in a downwards motion, locking the diagonal bit down, and working your way neatly down to the bottom. Try not to overlap any strands and keep it uniform. Knot it off once you reach the bottom.


7. Once you've finished wrapping and have made sure everything is super tight. Hold the wrap out straight and scruff it up with the scrub brush.

8. Flatten the edges down with a hair straightener. It just helps smooth the scruffy bits down and conceals the lines or "seams" of the yarn that make it obvious it's yarn.

9. What you should have is a nicely wrapped, smooth looking yarn-wrap.


10. Keep working till you have your desired amount. You can try different styles, use two different colours side by side in wrapping to create swirls, or use a single strand in an opposing colour to create criss-crosses, whatever you feel like.

The end~ Figured I should share this seeing I still have it on my computer haha.
Just some more pics of them.
Hell, I even made a full wig of these to get rid of some excess cheap yarn:


I hope no one minds me posting this.
Also I know a fair while back I had this was posted on VF's DTBD cult (My username was CitronicKitten), my account since has been deleted due to inactivity - So I'm not sure if this is still up there, of if it's fine to repost. If not, it can be taken down.
So the main idea behind these was I just wanted to get rid of some masses of el cheapo acrylic blended yarn you normally use for knitting that I had lying around. And yarn wraps I think are generally wrapped around your own hair, and I just used these to make falls instead as a more temporary option but didn't want them to look too obviously 'yarn-y" haha.
Pics of the end result:
Closeup:
Again I apologise for the pic quality, I don't mind redoing this at a later date with clearer pics.
What you'll need:
Some cheap yarn
Lace, or something to attach them to.
Scissors
A stiff-bristled scrub brush
Straightener.
1. Cut your lengths of yarn, generally longer than the length you want the end result to be.
(I used two different colours to show what was going on inside and outside)
2. Loop several strands of yarn over the lace and start braiding tightly until you get to the end.
Use more yarn to if you want a thicker end result.
3. Once you get to the end, use one of the loose end bits to make a tight knot at the end of your braid.
4. Using about 6-8 strands of yarn you've already precut, place them in a straight line without overlapping behind your braided strand. With about 2 inches overhanging on the left.
5. Fold the 2 inches on the left in a diagonal towards the right, holding it down tight.
6. Cross the remaining length you had overhanging on the right back over the diagonal bit you've just done, and wrap tightly in a downwards motion, locking the diagonal bit down, and working your way neatly down to the bottom. Try not to overlap any strands and keep it uniform. Knot it off once you reach the bottom.
7. Once you've finished wrapping and have made sure everything is super tight. Hold the wrap out straight and scruff it up with the scrub brush.
8. Flatten the edges down with a hair straightener. It just helps smooth the scruffy bits down and conceals the lines or "seams" of the yarn that make it obvious it's yarn.
9. What you should have is a nicely wrapped, smooth looking yarn-wrap.
10. Keep working till you have your desired amount. You can try different styles, use two different colours side by side in wrapping to create swirls, or use a single strand in an opposing colour to create criss-crosses, whatever you feel like.
The end~ Figured I should share this seeing I still have it on my computer haha.
Just some more pics of them.
Hell, I even made a full wig of these to get rid of some excess cheap yarn: